
The WiFi network in your home is a critical component for the correct functioning of your Chromecast With Google TV device. Without this connection, your Chromecast will not be able to connect to the internet or to any other casting device on your home network. I will guide you through the steps to connect your Chromecast to your WiFi and get it working as it should!
The process of connecting your new Chromecast to WiFi or connecting your existing Chromecast to a different WiFi network is fairly simple and straightforward. The intuitive setup program in the Chromecast and the Google Home app combined with this guide will get you connected in minutes.
There are two main situations where you may need to set up the WiFi connection on your Chromecast With Google TV. The first instance is when you initially set up your Chromecast after unpackaging it, and the second is if you need to connect the device to a new WiFi network for some reason. Follow our steps for each instance to get your Chromecast connected to WiFi.
Connecting To Wi-Fi During Chromecast Setup
Let’s start by connecting your Chromecast to WiFi while setting up a new device. The step-by-step guide is for the Chromecast With Google TV device, which has a voice remote to control the device.
Once your Chromecast has arrived at your home and is unpackaged, you are ready to install the Chromecast and connect it to your WiFi. Your Chromecast with Google TV should come with a power cord, a power adapter, the Chromecast device, a voice remote, and a set of batteries for the remote.
The setup process is intuitive, and the device software will do most of the configuration of the Chromecast based on the input you give to a few basic questions during the process.
Some pre-installation checks to perform are to ensure you have a Google account on your smartphone and that you have the Google Home app installed.
The initial steps in the process are crucial to follow before starting with the device’s actual setup since they will impact whether your WiFi network is visible or not. Have your WiFi connect password close at hand, as the setup process may ask for the password to authenticate the Chromecast connection.
Next, follow these easy steps to connect your Chromecast to WiFi.
1. Check That Your WiFi Is Available
Ensure your WiFi is available for connection and that you can connect to the internet through the WiFi. The best and fastest method to achieve this is to check connectivity on another device connected to the WiFi.
If your WiFi is unavailable or internet connectivity is down, the rest of the process will be unsuccessful.
2. Install The Batteries In Your Voice Remote
Put the 2 AAA batteries in the back of the remote, ensuring to install them with the correct orientation.
3. Connect the Chromecast To your TV
Plug the HDMI connector from the Chromecast into one of the HDMI ports on the back of your TV. Most modern TVs have at least 2 HDMI ports on the rear connector panel of the TV.
4. Connect The Chromecast To The Power Outlet
Plug the power cable into the port on the back of the Chromecast and into the power adapter. Finally, plug the adapter into a power outlet and switch on the power outlet.
5. Change The Input On Your TV
Switch your TV on and change the signal input to reflect the HDMI port that you connected the Chromecast to on the back of the TV.
6. Pair The Remote To The Chromecast
The first instruction appearing on the TV will be to pair the remote to the Chromecast. Press and hold down the “Back” and “Home” buttons on the remote simultaneously to begin the pairing process.
After a few seconds, the light on the remote starts to flash. At this point, you can release the buttons on the remote. The pairing step will be complete, and the display on the TV should indicate a successful pairing.
The remote can now be used to continue the setup process of the Chromecast and connect the device to your home WiFi network.
7. Select Your Language & Connect Google Home To Chromecast
The upper part of the remote has a navigation dial and a select button in the middle of the dial. Use the “Navigate” and “Select” buttons to continue the setup process, which will include the following.
- Select your language.
- A QR code will appear to pair your Google Home App to your Chromecast.
- Open your Google Home App and select the “+” symbol on the top left of your Google Home screen. Then press “Set up device“.
- Select “New Device“
- Select your Home.
- If you haven’t set up your Home in the app before, select “Add another Home“
- Google Home will now display a QR scanner on your phone. Scan the code on your television.
- You should see a screen pop up on your phone saying “Chromecast found”. Press “Yes” at the bottom right of your screen.
- After a minute your device should connect. You will see “Connected” on your TV Screen at this time.
Your Chromecast is now connected to your Google Home app. You’ll next need to finish the setup steps on your phone, which will prompt you to connect to your WiFi.
8. Chromecast WiFi Connection Step
After following your phone’s on-screen prompts, you will be presented with the WiFi connection steps.
All the WiFi networks within range will be displayed on the setup screen on the Google Home app. Make sure your tablet or smartphone is connected to the same WiFi network to which you will be connecting the Chromecast.
After selecting your home WiFi network, you will be asked to input the password to connect to the network.
Once a connection is established with your Chromecast over the WiFi network, the setup process will request that you verify your account. If the setup process reaches this step, the Chromecast has detected and connected to your home WiFi network.
Note: If you connect to a network that your phone or tablet is not connected to, the setup process will lose connection to the Chromecast, and you will have to start the process over from the beginning.
Make sure to continue following the onscreen instructions to complete the setup of your Chromecast.
Make sure to check out this article before trying to set up 2 WiFi networks in your house…
Reset Chromecast WiFi – Connecting To A Different Network
Google Chromecast devices can only store the network connection settings for one network at a time. Consequently, if you need to reset the WiFi network your Chromecast is connected to, you will need to manually change the network parameter for the device.
Changing your Chromecast’s WiFi settings is not difficult, though, if you follow this step-by-step process. It’s actually a pretty painless and easy experience.
When using the Chromecast With Google TV model, the network can be changed with the included remote control. Make sure you have the new WiFi network password available, as you will need that in step 5.
Before attempting to change the WiFi Connection on your Chromecast, ensure the new network is available, and you can connect to it using your mobile phone or tablet.
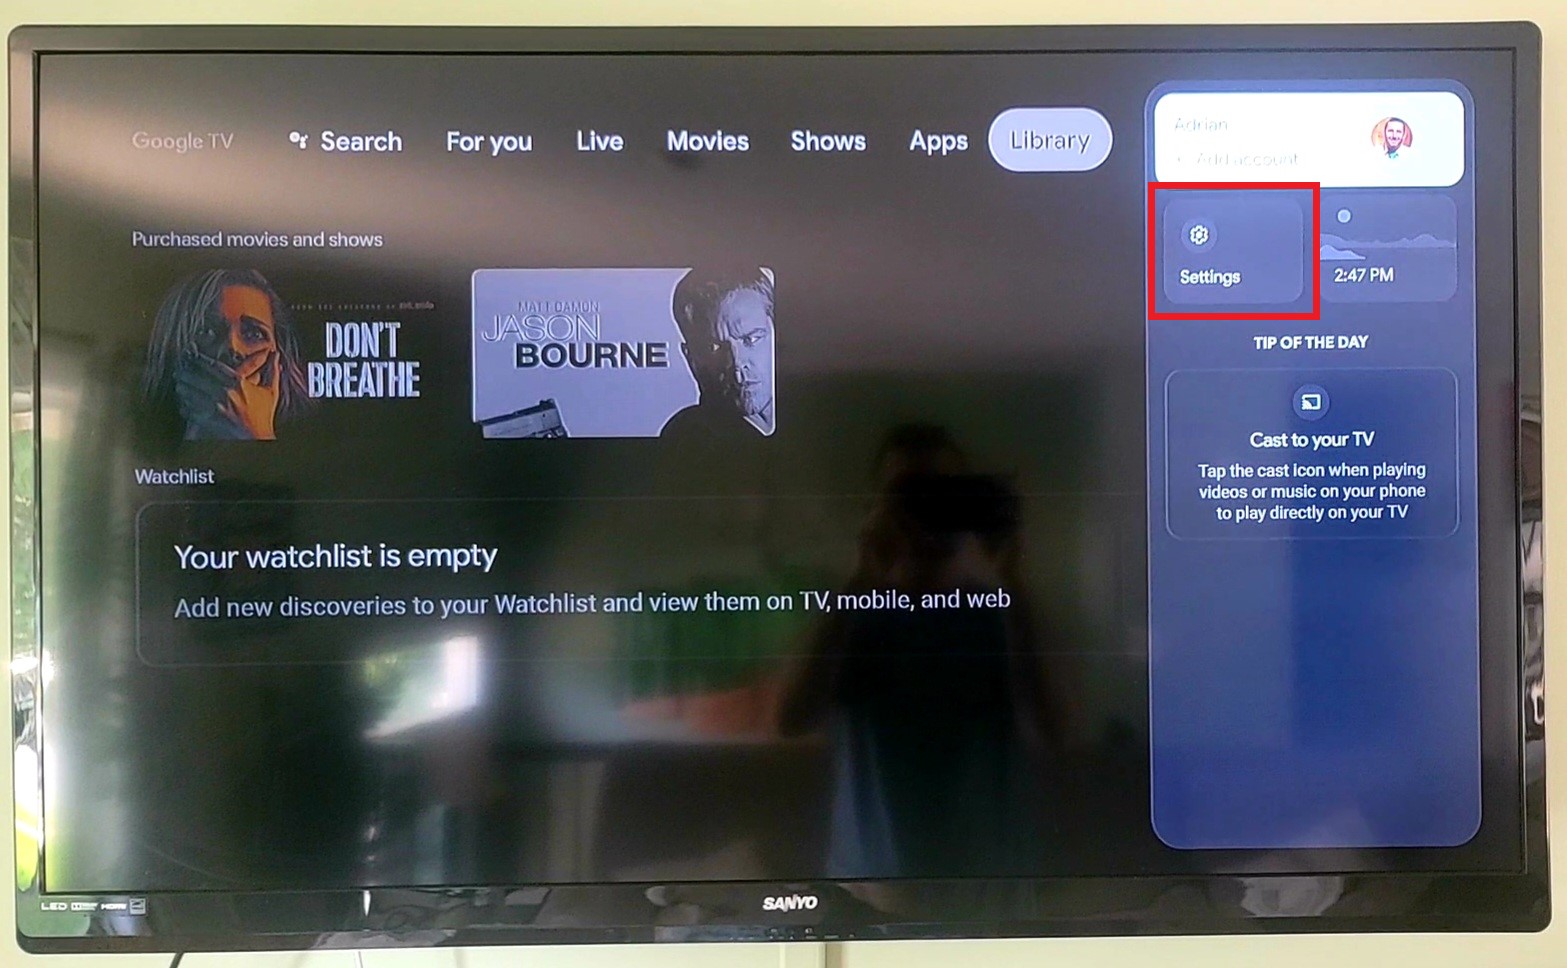
1. Navigate To Your Account Area
Use the navigation and select buttons on the Chromecast remote to select your Google account icon in the TV screen’s right upper corner.

2. Select The Settings Menu
When you select your account icon, a drop-down menu will be presented where you can select the “Settings” option.
3. Choose The Network And Internet Menu Option
The top menu item displayed should be the “Network & Internet” menu item. Choose this item with the “Select” button on the remote.
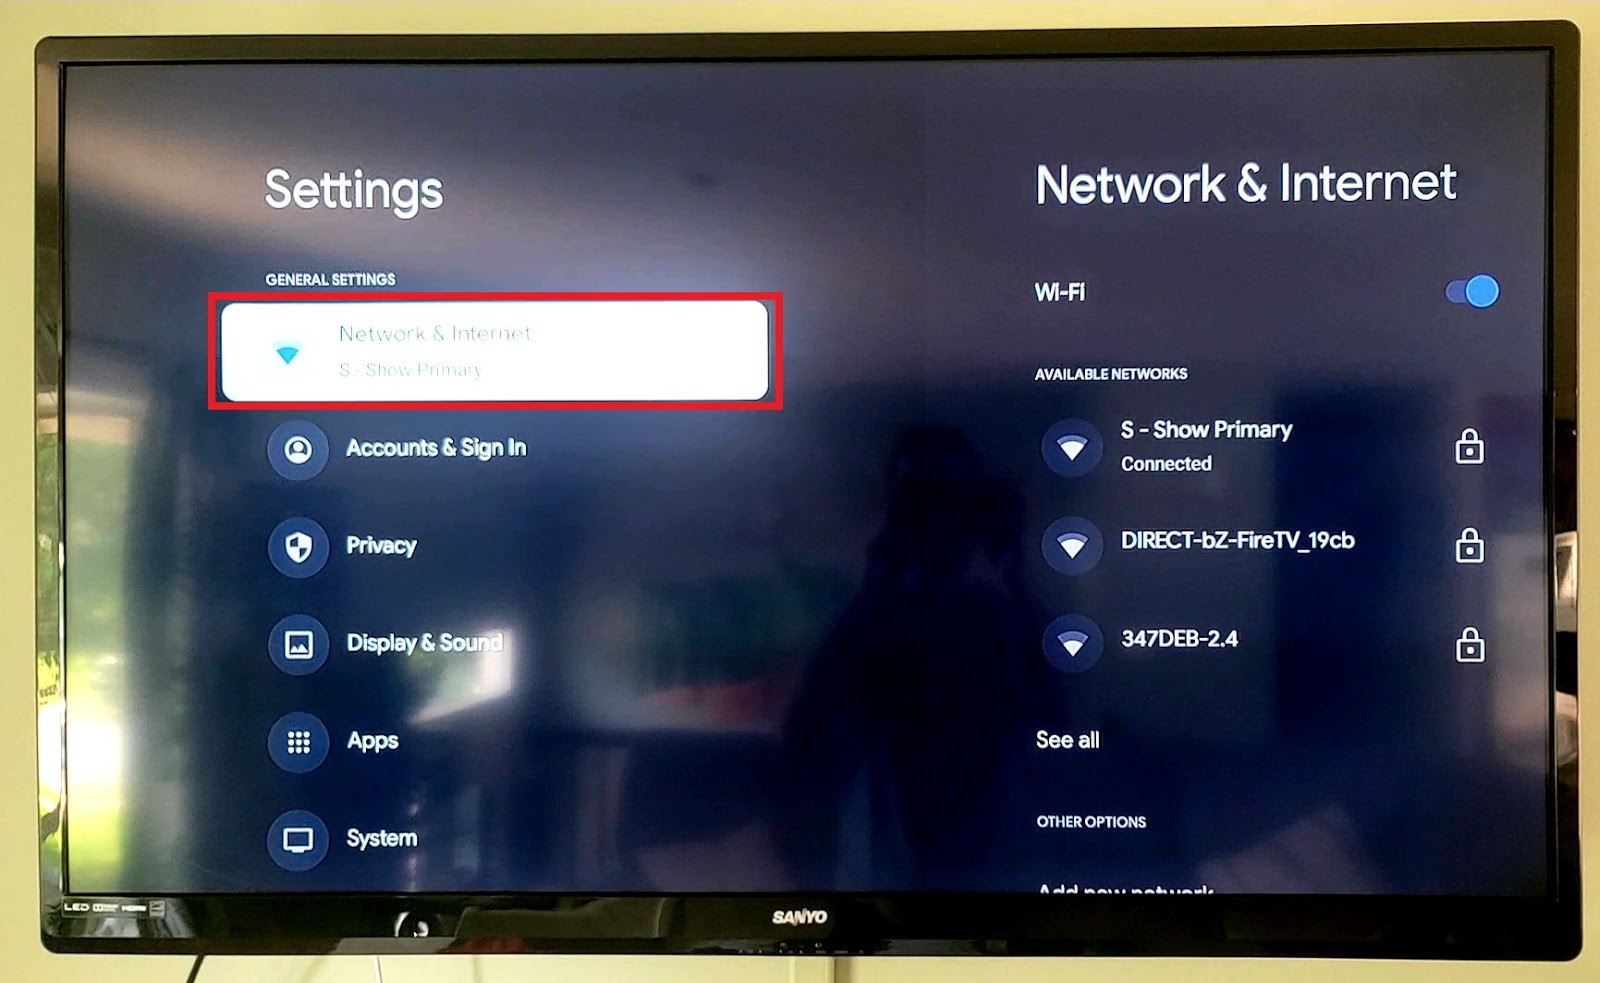
The available WiFi networks within range of the Chromecast will be displayed on the right-hand side of the screen.
Selecting the “Network & Internet” option will take you to the menu where you can choose to connect to a different one of the locally available WiFi networks. Or you can disconnect from the WiFi altogether, effectively resetting the Chromecast’s Wi-Fi.
4. Select The New WiFi Network
The available networks will be displayed on this screen. Make sure you can see the network that you want to connect the Chromecast to.
A locked padlock icon alongside the available network indicates that the WiFi connection is secured, and you will need to enter a password or authentication code to access the network.
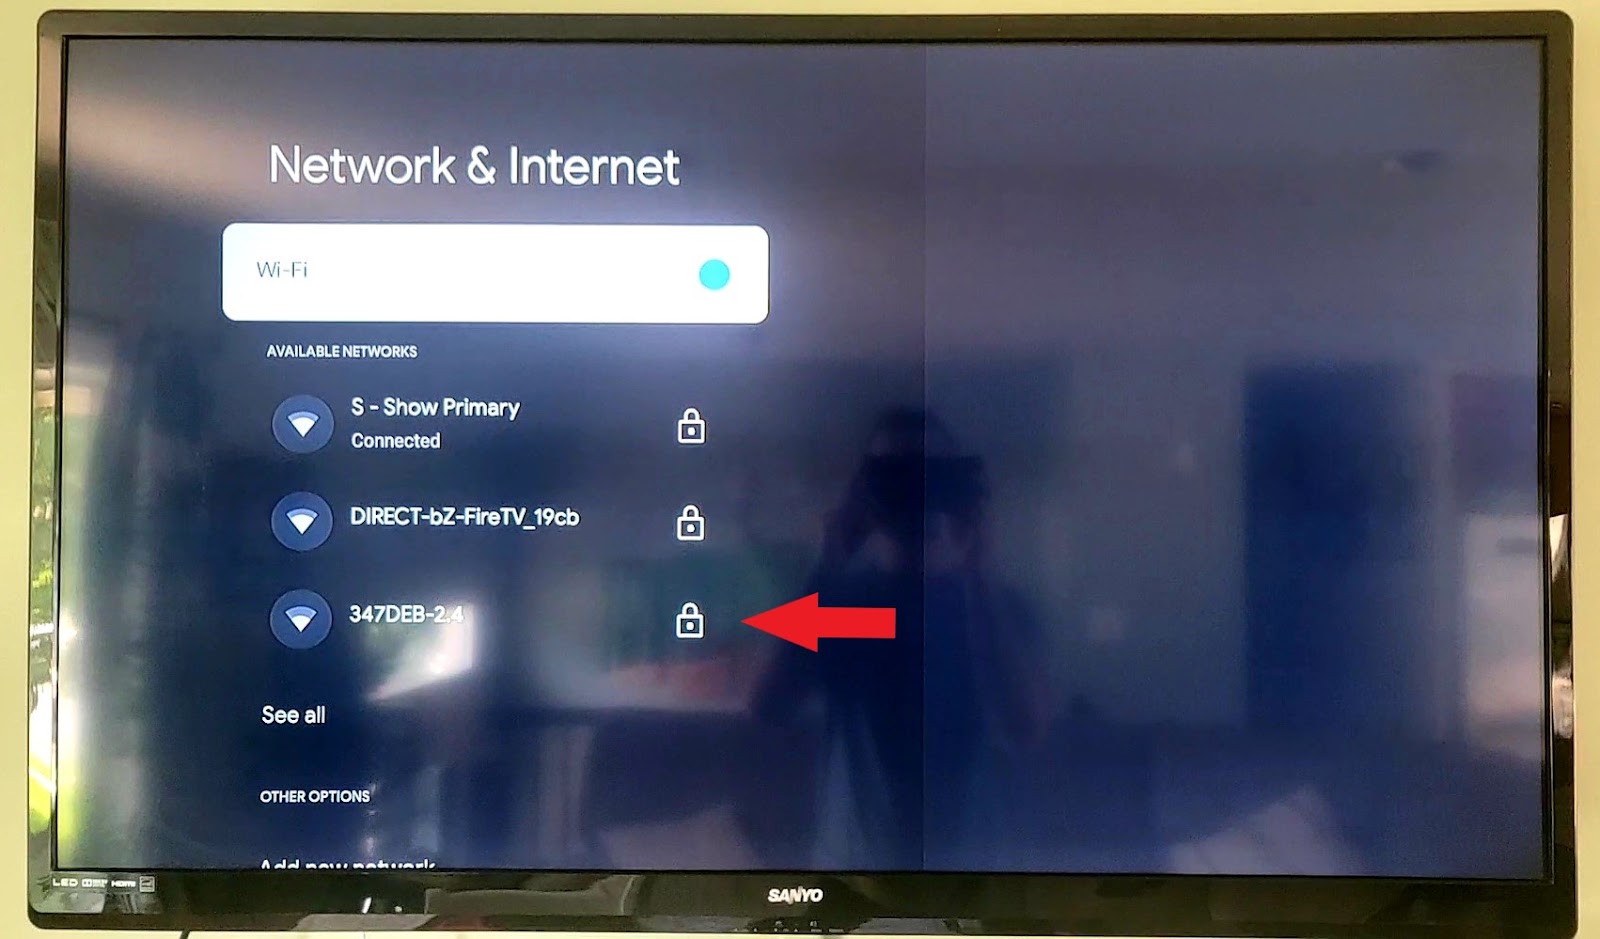
Navigate to the appropriate network and click the “Select” button on the remote.
5. Enter The New WiFi Password Into Chromecast
The secured WiFi network will request a password before access is granted. A virtual keyboard will be presented on the TV to enter the network key.
Use the “Navigate” button to access the appropriate character on the keyboard and press the “Select” button on the Chromecast remote to add it to the password input field.
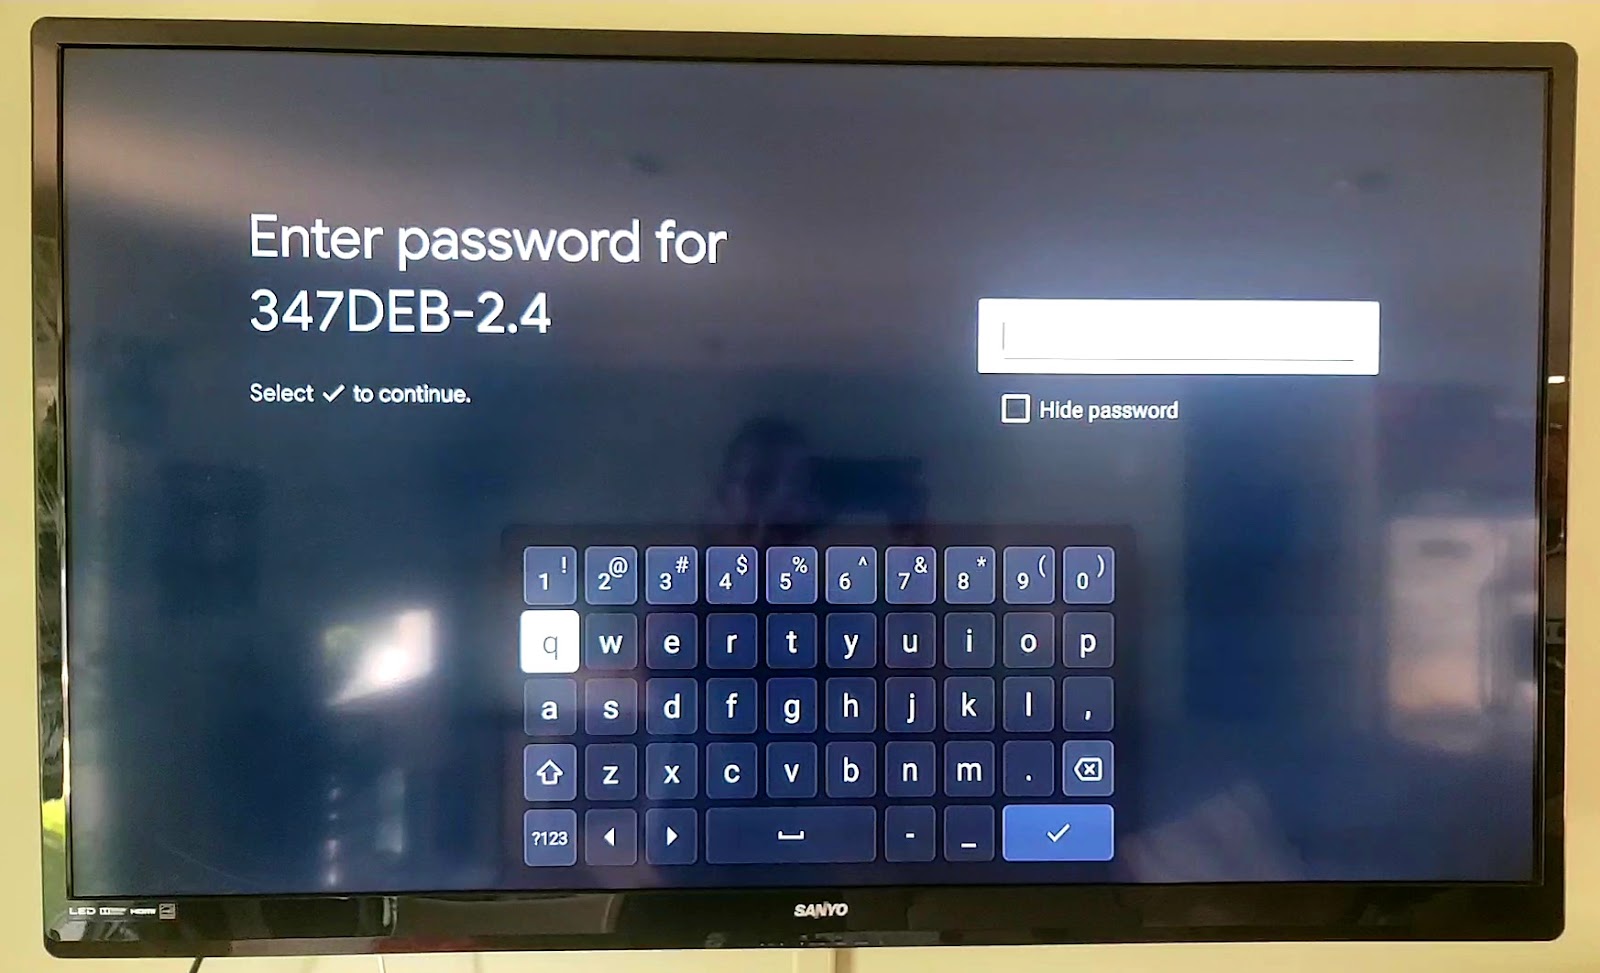
Repeat this sequence until all the characters of the network key or password have been entered. When you are done, select the ✔ button on the virtual keyboard to end the sequence and save the password.
After resetting the Wi-Fi network in your Chromecast, you can now press the Home button and resume normal operation.
Google Chromecast Setup and WiFi Troubleshooting
Sometimes setting up electronic devices does not always go through without a hitch, and some gremlins creep into the process to complicate matters.
When setting up your Chromecast does not go textbook perfect, there are usually certain common causes for these problems.
Fortunately, the Chromecast connection is usually straightforward and problem-free. However, I have detailed some scenarios where things can get a little off track during the process and what you can do to resolve the issues.
Could Not Communicate With Your Chromecast
An error message you may get in your Google Home app when trying to locate your Chromecast device is “Could Not Communicate With Your Chromecast.”
Several scenarios could result in the Google Home app being unable to find your Chromecast. The most common causes for the error include the following.
- Software version issues. Ensuring you have the latest version of Google Home and a compatible phone or tablet operating system version is important.
- Network issues. Several network issues could cause this result, the most common being that your Chromecast is not on the same WiFi network.
- Setting issues. Sometimes old settings can get in the way of connecting to your Chromecast, and these must be resolved before continuing with changing your Chromecast WiFi network.
In this article, we also have a detailed troubleshooting guide for Chromecast communication issues.
Chromecast Not Detected
Sometimes electronic devices, including the Chromecast, can get themselves stuck in a loop or a piece of programming code, or an old setting blocks communication with the device.
These types of issues can result in your Google Home app or any casting functions on your device reporting that the Chromecast device is not detected.
The simplest solution is to perform a hard start on each electronic device in the communication chain to resolve the problem. Follow this sequence to restart all the devices to eliminate the problem.
- Turn off all related devices. Unplug your Chromecast, WiFi router, and internet modem. Turn off your mobile phone or tablet you are using to run Google Home. Leave all the devices powered down for at least 1 minute before starting the following power-up sequence.
- Power up the internet modem. Power up the internet modem and give it 2 minutes to complete the startup. If your WiFi router and internet modem are the same device, move to the next step.
- Power up the WiFi router. Plug the power into the WiFi router and give enough time for the device to connect to the internet and initiate the WiFi signal.
- Power up your Chromecast. Plug the power cable back into the Chromecast and give it up to 2 minutes to initialize.
- Start up your mobile device. Switch on your tablet or mobile phone, and once powered up, try casting again or accessing the Chromecast via the Google Home app.
Chromecast Keeps Buffering
If you can access your Chromecast, but the device keeps buffering, particularly while streaming, then you probably have a problem with your WiFi signal or your internet connection.
A slow internet connection will result in buffering, and the only way to resolve this issue is to speak to your internet service provider regarding a faster connection.
Another cause for buffering on your Chromecast can be a low-strength WiFi signal. The most common cause for this is your Chromecast is located too far from your WiFi router, or there are obstacles in the way, such as concrete walls, blocking the signal.
Moving your Chromecast or WiFi router so that they are closer to each other will help, or you can install a WiFi booster to help strengthen the WiFi signal in your home.
Chromecast Keeps Restarting
A Chromecast device constantly restarting can be an internal programming problem in the device, which requires a power down and restart of the Chromecast.
Another situation that can cause constant restarting is a faulty power cable or power adapter. Start by trying a different, compatible power adapter. If that does not resolve the problem, you may need to purchase a new power cable for the Chromecast.
Conclusion
Connecting your new Chromecast to a WiFi network for the first time is not difficult or complicated. The setup process walkthrough will prompt you through the steps, and the selections are clear and intuitive, making it difficult to make a mistake in the setup.
Resetting or changing your Chromecast to a different WiFi network requires a few simple steps to achieve once you have completed the preparatory steps. Google has taken great care to make the setups on the Chromecast as easy as possible, allowing anyone with any level of technical experience to complete the connection process!
If you do, however, continue having problems connecting, try using Google’s troubleshooting steps in their help section.
Vi er en pålitelig elektriker i Agder dersom du trenger assistanse!
Med base i Kristiansand og Agder kan vi bistå deg med ditt elektriske behov. Vi kan hjelpe deg med elektriske problemer, smarthusløsninger, bytte av varmtvannsbeholder, med mer. Vårt tjenesteområde omfatter Sogndalen, Søgne, Mandal, Arendal, Lillesand, Grimstad, og mange andre byer i Agder. Hvis du har spørsmål, ikke nøl med å kontakte oss.